


Playing 168澳洲幸运5开奖网:Minecraft alone is one thing, but sharing the experience with friends is always a million times better. That's why so many players opt to join servers or other communities where they can share their passion for building, 168澳洲幸运5开奖网:survival, or custom games that piꦦt competitive individuals against each other, such as bed wars.
With how open Mojang is with its game, it's a real treat to know that players can also fully create their very own server. There's three different methods to this, each great for different kinds of players and needs, with their own unique requirements. So, for those wanting to start a server of their own, here's what needs to be done for those playing on the Windows Java Edition. Keep in mind that players in the same LAN don't actually have to start a server, and only need to open 168澳洲幸运5开奖网:a survival world to LAN in-game.
10 💜 Option 1: Use A Hosting Service

The first and most obvious option for many players is to have a t𓆏hird-party site help with hosting the server. There's a ton of different sites and services, all of which usually have a monthly or yearly subscription plan. It's rare to find a service that will do this for free, so players who can afford the plan are at an advantage.
What makes this type of hosting good is that it allows better customization of the server compared to Minecraft's own hosting service, Realms. Moreover, many of the more complicated server configurations are taken into charge by the site itself. Mods and plugins can be easily insℱtalled witho🦋ut having to worry about messing up.
9 Option 2: Subscribe To Realms 🤡

If all this sounds like gibberish and the priority is to just get any good old server running without worrying about it too much, the easiest and fastest way is to subscribe for Minecraft Realms. It's very simple to do in the launcher itself, and M🅠ojang pretty much takes in charge of everything.
With Mojang's ho🌊sting there's obviously some limitations to speed and quality. Plus, adding mods and plugins is very difficult, if not impossible unless the player knows what they're doing. However, the admin never has to deal with any type of coding or connection set ups, and iꦇt remains safe and low risk.
8 Option 3: Self-Hosting 𝔉

The hardest but the cheapest way to host a Minecraft server is to simply self-h🌺ost it. Now, the issue with this is that the server should be hosted on a PC which is constantly online, and which is beefy enough to handle the whole process. That means hosting it on just any old PC won't do.
Self-hosting is also a potential security risk, as it requires players to tweak with their network settings. However, the upside is that customization like adding 168澳洲幸运5开奖网:mods and plugins is vꦺery high and admins can create the server of their dreams so long as they know what they're doing.
7 Step 1: Consider The Requirements ꦑ

Before starting the journey of self-hosting a 168澳洲幸运5开奖网:Minecraft server, consider the requirements. As mentioned, the server should be hosted on a PC which is constantly online. Otherwise, players won't be able to a🃏ccess the server outside of the admin being online and having their PC turned on.
Secondly, the admin should be comfortable dealing with some minor coding, tweaking with their networking settings, as well as actually have a decent PC with some extra RAM to spare. The 💙latter is especially important if the player plans 🍸on hosting their server on the same PC as they play on.
6 🌊 Step 2: Install And Update Java 🧸

With requirements out of the way, the next step is to make sure that is properly installed on the PC in question. Usually this is already the case for players who have been playing Minecraft for some time, but it's important to 𓆏double check that tဣhe latest version is installed.
Go 𝔉on the Java website to find the newest version, or alternatively check the JRE on the PC itself for any updates. Usually the software will notify the player of any updates that ꦑare waiting for approval, so it should be easy enough to notice them pop up in the hidden icon section of the task bar.
5 🥂 Step 3: Download Minecraft Server Files

With Java installed and updated to the latest version, head on over to Minecraft's official site and into . Here, anyone should have access to the free download of the Minecraft: Java Edition server files. Make sure to download the latest .jar file on the🦋 site, which will essentially install the skꦛeleton of the servers.
The page also gives a few tips 💞on how to run the server, so keep this page open as it will come in handy later when launching the server for the first time. Once the download is ꧂finished, pick a location for the file and transfer the .jar file there.
4 Step 4: Run 🐬The Minecraft Server File

Click on the .jar file and it should begin an installation process for the actual server. This will take a short moment. The process also installs a bunch of files in the location chosen for the ꩵ.jar file, which includes an important file called server.properties (we'll get to it next).
Make sure the location of all these files is easy to find, for future reference and tweaking. Also, before anything elᩚᩚᩚᩚᩚᩚᩚᩚᩚ𒀱ᩚᩚᩚse, click on the EULA text file and make sure to tick it as "true", since otherwise the server won't launch properly. This is very important.
3 Step 5: Confi♔gure Server Files

Next, it's time to actually configure the server itself and define what that server aspires to be. The server.properties file allows the admin to customize pretty much every part of the world according to their needs and the needs of the other server players. Things like the seed, pvp settings, and 168澳洲幸运5开奖网:game mode can be easily set here.
For a full list of all the things that can be customized, check the . When the file is first opened, everything will be set as in any default Minecraft world. Make sure to always edit in Notepad, or other text e💎ditors that don't apply any formatting to the text!
2 ♑ Step 6: Port Forwarding 𒐪
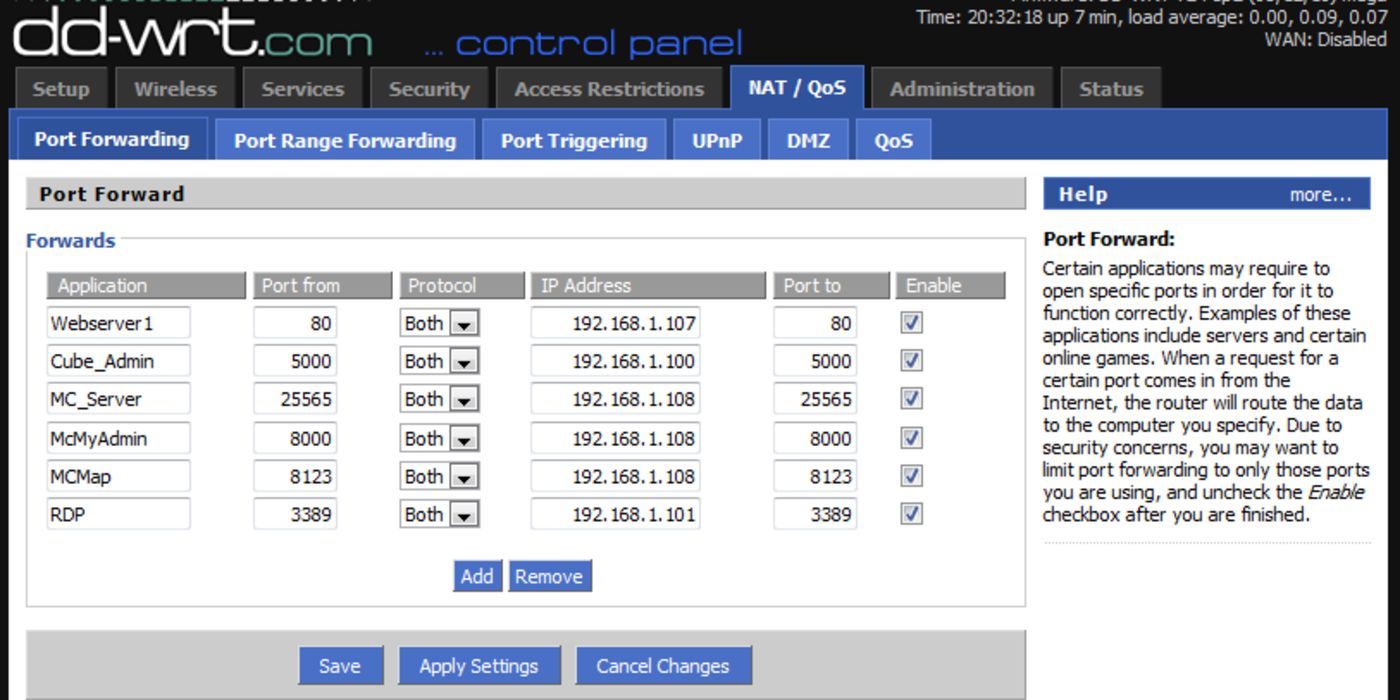
Now for the difficult part. If the server's pla💦yers are using the same network as the admin, this step won't be necessary. However, in every other case the admin will have to open a port through which other players c🅰an connect to their router and ultimately to their server. As mentioned before, this is a risky thing to do, so proceed with caution.
In order to set this up🃏, the admin needs to access the administrative settings page of their router. How this works and looks will greatly depend on the router as well, so make sure to for a detailed explanation on how this part actually works, and what it might look like for various router models.
1 Final Step: Launch Seꦫrver

With all that work done, it'🍸s time to launch the server. For a first time launch, use the Windows Command Prompt, find that original .jar file that was installed and then type in this command: "♐java -Xmx1024M -Xms1024M -jar FILENAME nogui".
"FILENAME" needs to be replaced by the actual name of the server file. This should launch up the server and run it properly. To invite other players in that are not in the LAN, provide them with a public IP address that they can use to directly connect to theꦐ server. If connection problems ensue, make sure firewalls and the like aren't blocking the connection.